 | Welcome to Diamond Mind Baseball |
|
| What's new and different |
 | User Interface Tips |
|
| Selecting Multiple Items in a List |
|
| Popup Menus |
|
| Tutorials |
|
| Tutorials Overview |
|
| Basic Tutorial |
|
| Setting Up |
|
| Game Options |
|
| Managers |
|
| Color and Text |
|
| The Game Screen |
|
| The Game Screen |
|
| Lineups |
|
| The Scoreboard |
|
| Batters |
|
| Pitchers |
|
| The Diamond |
|
| The Benches |
|
| The Boxscore, Scoresheet, and Game log Tabs |
|
| Sample Boxscore |
|
| Sample Scoresheet |
|
| Sample Game log |
|
| Playing the Game |
|
| Defensive Tactics |
|
| Offensive Tactics |
|
| When the Game is Over |
|
| Saving Game Data |
|
| Advanced Tutorial |
|
| Advanced Tutorial Setup |
|
| Game Day |
|
| Scheduled Games |
|
| Play Options |
|
| Setting the Lineup |
|
| Lineup Overview |
|
| Starting Pitchers |
|
| Batting Order |
|
| Setting Up a League |
|
| Introduction |
|
| League Setup Overview |
|
| Your Primary Tool |
|
| Common Scenarios |
|
| General Rules |
|
| Preparing the Database |
|
| Your First Database Decision |
|
| Starting with an Existing Database |
|
| Starting with a New Database |
|
| Gathering the Components |
|
| Introducing the Components |
|
| Assembling Eras |
|
| Assembling Teams |
|
| Assembling Parks |
|
| Assembling Players |
|
| Putting It All Together |
|
| The Big Picture |
|
| Creating a League |
|
| Creating an Organization |
|
| Assigning Teams |
|
| Assigning Players |
|
| Generating a Manager Profile |
|
| Creating a Schedule |
|
| Managing DMB Databases |
|
| What is a Database? |
|
| Converting Databases |
|
| Creating a New Database |
|
| Changing the Active Database |
|
| Copying a Database |
|
| Adding a Reference to an Existing Database |
|
| Removing a Reference to an Existing Database |
|
| Installing a Season Disk |
|
| Migrating a Database |
|
| Backing Up Your Data |
|
| Restoring Your Data |
|
| Organizer |
|
| Organizer Overview |
|
| Teams |
|
| Teams: Overview |
|
| Creating a New Team |
|
| Importing Teams |
|
| Parks |
|
| Parks: Overview |
|
| Parks: General Information |
|
| Parks: Physical Characteristics |
|
| Parks: Image Files |
|
| Parks: Weather Patterns |
|
| Parks: Statistical Factors |
|
| Creating a New Park |
|
| Importing Parks |
|
| Players |
|
| Overview of Players |
|
| Players: General Information |
|
| Players: Player UID |
|
| Players: Real-life Statistics |
|
| Players: DMB Statistics |
|
| Players: Ratings Overview |
|
| Players: Offensive Ratings |
|
| Players: Defensive Ratings |
|
| Players: Pitching Ratings |
|
| Players: Pitcher Profile |
|
| Players: Injury Ratings |
|
| Players: Injury and Usage Info |
|
| Creating a New Player |
|
| Modifying a Player |
|
| Importing Players |
|
| Player Profiles |
|
| Leagues |
|
| Overview of Leagues |
|
| Leagues: General Information |
|
| Leagues: League Teams |
|
| Leagues: Rules and Options |
|
| Leagues: Playing Time Limits |
|
| Leagues: Post-Season Information |
|
| Creating a New League |
|
| Organizations |
|
| Overview of Organizations |
|
| Organizations: General Information |
|
| Organizations: Rules and Options |
|
| Organizations: Playing Time Limits |
|
| Organizations: Post-Season Information |
|
| Creating a New Organization |
|
| Eras |
|
| Overview of Eras |
|
| Eras: General Information |
|
| Eras: Rates |
|
| Creating a New Era |
|
| Importing Eras |
|
| Schedules |
|
| Overview of Schedules |
|
| Creating a New Schedule |
|
| Schedule Editing |
|
| Adding Games |
|
| Copying Games |
|
| Scheduling Tools |
|
| Generating Regular-season Schedules |
|
| Generating Post-season Schedules |
|
| Schedule Templates |
|
| Importing and Exporting Schedules |
|
| Editing Game Results |
|
| Drafts |
|
| Drafting: Overview |
|
| Draft Preparation |
|
| Creating a Draft |
|
| Draft Window |
|
| Setting the Draft Order |
|
| Working with Draft Picks |
|
| Manual Picks |
|
| Computer Picks |
|
| Drafting and Manager Profiles |
|
| Resuming a Draft |
|
| Deleting a Draft |
|
| Notes |
|
| Overview of Notes |
|
| Editing Transactions and Injuries |
|
| Editing Transactions |
|
| Editing Injury Reports |
|
| Rosters and Manager Profiles |
|
| Roster/MP Window: Overview |
|
| Manager Profiles |
|
| What is a Manager Profile? |
|
| Pitching Chart |
|
| Saved Lineups |
|
| Depth Charts |
|
| Playing time limits |
|
| Manager Tendencies |
|
| Player Tendencies |
|
| Roster / manager profile window |
|
| Roster Management |
|
| Pitching chart page |
|
| Saved lineups page |
|
| Depth charts page |
|
| Manager tendencies page |
|
| Player tendencies page |
|
| Manager Profile Report |
|
| Manager profile generator |
|
| Playing Games |
|
| Playing Games: Overview |
|
| Exhibition Game Options |
|
| Managers: Human or Computer |
|
| Game view preferences |
|
| Modify Weather |
|
| Playing Scheduled Games |
|
| Scheduled game window |
|
| Starting scheduled games |
|
| Scheduled game options |
|
| Special Events |
|
| Starting Lineups and Substitutions |
|
| Overview of Lineup Selection |
|
| Lineup Selection: Window Layout and Tools |
|
| Lineup Selection: Using Real-life Lineups |
|
| Lineup Selection: Choosing Starting Pitchers |
|
| Lineup Selection: Choosing Starting Lineups |
|
| Lineup Selection: Loading Saved Lineups |
|
| Lineup Selection Making Substitutions During a Game |
|
| During the Game |
|
| Game Window |
|
| Pitching Tactics |
|
| Defensive Tactics |
|
| Offensive Tactics |
|
| Baserunning Decisions |
|
| Warmups and Substitutions |
|
| Other Options |
|
| Saving a game in progress |
|
| Resuming a saved game |
|
| NetPlay |
|
| NetPlay Overview |
|
| Preparing to Host a NetPlay Session |
|
| Finding Your IP Address |
|
| Firewalls |
|
| Opening a Port |
|
| The NetPlay Control Panel |
|
| NetPlay Options |
|
| Connecting to the Host |
|
| Chatting Before or After a Game |
|
| Starting a Game |
|
| Choosing Starting Pitchers and Lineups |
|
| Playing a Game |
|
| Quick Play |
|
| Chatting During a Game |
|
| Abandoning a Game |
|
| When a Game is Over |
|
| Disconnecting |
|
| If the Connection is Dropped |
|
| Trouble-shooting |
|
| Reports |
|
| Overview of Reports |
|
| Generating Reports |
|
| Displaying Reports on the Screen |
|
| Printing Reports |
|
| Saving Reports to a File |
|
| Custom Reports |
|
| Adding a New Column |
|
| Memorized Reports |
|
| HTML formatting |
|
| Report Options |
|
| Report Options Overview |
|
| Batting Register Report Options |
|
| Report Groups |
|
| Report Groups Overview |
|
| Two Ways to Use Report Groups |
|
| Generating a report group |
|
| Creating and Modifying a Report Group |
|
| Adding a Report to a Report Group |
|
| Generating a web site |
|
| Overview of Web Site Generation |
|
| Generating a web site |
|
| Transfers |
|
| Transfers: Overview |
|
| Setting up the League |
|
| Exporting a League Database |
|
| Installing a League Database |
|
| Creating a League Database |
|
| Exporting Statistics |
|
| Importing Statistics |
|
| Rebuilding Database Indexes |
|
| Updating Streaks and Usages |
|
| Tools |
|
| Restarting a Season |
|
| Resetting player usage |
|
| Trading Players |
|
| Releasing Players |
|
| Deleting team-specific player records |
|
| Generating Manager Profiles |
|
| Important Concepts |
|
| Bullpen Warmup Rule |
|
| Catcher fatigue |
|
| Clutch and Jam Ratings |
|
| Player Status Codes |
|
| Playing out of postion |
|
| Reading the Scoresheet |
|
| Reading the Game log |
|
| Real-life Transactions and Lineups |
|
| Sacrifice Fly Rules |
|
| Weather System |
|
| Uninstalling Diamond Mind Baseball |
Eras Rates
The "Rates" tab enables you to create and modify some important information about the era.
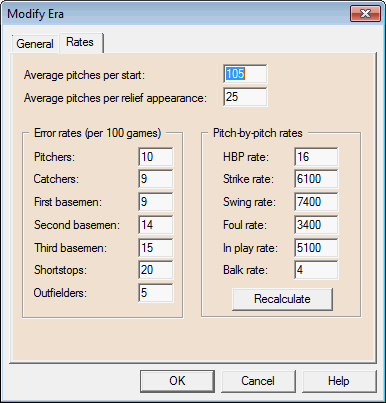
There are three groups of rates on this page. The first group determines pitcher durability, the second determines error rates, and the third governs the pitch-by-pitch system. Let's consider each group in turn.
Average pitches
The values for average pitches per start and per relief appearance determine how quickly your pitchers will get tired.
Keep in mind that there are many reasons other than fatigue for a pitcher to be removed from a game -- ineffectiveness, the need for a pinch hitter, a double-switch, injury -- so the average number of pitches thrown is usually lower than the number of pitches he can throw before getting tired in any particular game. This is, of course, assuming the pitcher doesn't enter the game having already thrown a bunch of pitches in the last couple of days.
For example, if the average number of pitches thrown per start is 95, a pitcher with an average durability rating can probably throw at least 110 pitches before tiring if he enters the game at full strength. And a pitcher with an Excellent durability rating can probably throw more than 130 pitches before beginning to weaken.
See Pitching Ratings for a table showing how the average number of batters faced has changed over the past 100 years. You can use this table as a guide when choosing the average pitch values for your eras. You'll need to multiply these batter faced numbers by the average number of pitches per batter faces.
Unfortunately, this type of pitch count information isn't known for most of baseball history. We know that the average number of pitches per batter was in the 3.6 to 3.8 range in the 1990s. And we know the rates of walks and strikeouts were at or near all-time highs in the 1990s, so it stands to reason that batters were seeing fewer pitches per plate appearance for most of baseball history. But how much lower is a matter of speculation. Our best estimate is that these rates have ranged from 3.1 to 3.8 over the course of the last hundred years.
Error rates
The error rates are expressed as the number of errors made per 100 games. We chose 100 games because the length of a season has changed over time, and we wanted a stable period of time to work with.
See Defensive Ratings for a table showing how error rates have changed over the past 100 years. You can use this table as a guide when choosing error rates for your own eras.
Pitch by pitch rates
The pitch-by-pitch rates govern how often a pitch results in a hit batsman, called ball, called strike, and so on. Click the Recalculate button to have DMB produce these values based on the era statistics that were entered on the General page.
These values have the following meaning:
-
HBP rate. The number of pitches (per 10,000) that result in a hit batsman.
-
Strike rate. The number of pitches (per 10,000) that result in a strike (called, swinging, foul ball, ball in play).
-
Swing rate. The number of strikes (per 10,000) on which the batter swings.
-
Foul rate. The number of swings (per 10,000) that produce a foul ball.
-
In play rate. The number of swings (per 10,000) that produce a ball in play.
-
Balk rate. The number of balks per 10,000 pitches with runners on base.
You can change the pitch-by-pitch rates, but it's not always easy to figure out the effect that your changes will have on your games. For example, increasing the In play rate will reduce the number of walks and strikeouts because more balls in play means that you won't have as many plate appearances that make it all the way to four balls or three strikes. But the amount by which it will reduce walks and strikeouts depends on the other pitch rates. An increase in the foul rate would reduce the number of strikeouts (by keeping the batter alive on more two-strike pitches) and increase the number of walks (because the batter may go on to draw walks where he might have already been struck out before). It's even harder to predict what will happen if you change more than one of these values at the same time.
Most of the time, the generated pitch-by-pitch rates will give you very accurate results. When we design season disks, we always start with these calculated rates. We occasionally make adjustments, but those adjustments are always small, and we often have to experiment by simulating the season a few times before we settle on a set of adjustments that gives us the results we're seeking.