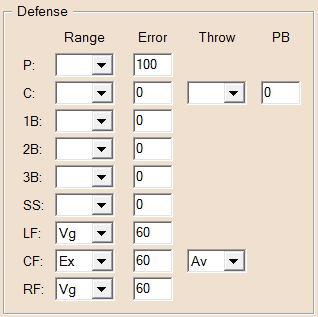
Players: Defensive Ratings
Players should be assigned defensive ratings only for the
positions they normally play. All positions have a range rating
that reflects the player's ability to reach batted balls and turn
them into outs and an error rating that reflects his tendency to
make errors. Throwing ratings are assigned to catchers and
outfielders. Catchers also have passed ball ratings.
The defensive ratings are grouped in a box in the upper-right
corner of the player ratings form:
Range rating
This rating indicates a player's ability to reach balls hit in
his direction and turn those batted balls into outs. Most baseball
announcers use the "range" to mean the ability to cover ground, and
that's certainly an important part of what goes into our range
ratings. But it's not the whole story.
Our range rating (which takes values from Excellent to Poor)
measures each fielder's overall playmaking ability (minus his
tendency to commit errors, as we have a separate rating for that).
Playmaking ability is not just about range, it's also about
positioning, handling the ball cleanly, throwing quickly and
accurately, and making good decisions about where and when to throw
the ball.
For modern seasons, we carry out very extensive studies of
play-by-play data when assigning our range ratings. We look at each
player's individual performance on the balls hit his way, overall
team defense, the effects of neighboring fielders (3B often take
balls that the SS could have handled anyway, so we don't punish the
SS for failing to make those plays), and ballpark effects.
Unfortunately, good fielding data can be hard to get for past
seasons. The best sources we've found are the team section of the
Macmillan Baseball Encyclopedia and the STATS All-time Major League
Handbook.
By comparing putouts (for outfielders) and assists(for infielders), and adjusting for playing time, you can
get an idea how a player compares with his peers. These types of
measures (commonly known as range factors) can sometimes be very
misleading, however, as they don't take into account the
groundball/flyball nature or left/right mix of the pitching staff.
The more of these factors you can take into account when assigning
range ratings, the more accurate your ratings will be.
Error rates
This rating is a percentage indicating how this player's error
rate compares to the average fielder at his position in the era in
which he played. A rating of 100 means the player is average --
that is, he makes 100% of the errors expected of someone at that
position. A player who makes only 50% as many errors as his peers
is rated 50. Someone who makes twice as many errors as his peers is
rated 200.
The following table summarizes how error rates have changed over
time, in five-year intervals. Each entry in the table is the number
of errors made per 100 full games (or 900 defensive innings).
|
Year
|
P
|
C
|
1B
|
2B
|
3B
|
SS
|
OF
|
|
1895
|
24
|
27
|
26
|
44
|
46
|
67
|
19
|
|
1900
|
22
|
24
|
23
|
38
|
38
|
59
|
14
|
|
1905
|
18
|
22
|
20
|
31
|
28
|
50
|
10
|
|
1910
|
16
|
19
|
18
|
28
|
25
|
45
|
9
|
|
1915
|
16
|
17
|
15
|
25
|
22
|
40
|
9
|
|
1920
|
14
|
14
|
13
|
23
|
20
|
35
|
8
|
|
1925
|
12
|
12
|
11
|
21
|
17
|
32
|
8
|
|
1930
|
10
|
10
|
10
|
19
|
16
|
30
|
7
|
|
1935
|
10
|
10
|
10
|
18
|
16
|
27
|
7
|
|
1940
|
10
|
10
|
10
|
17
|
15
|
25
|
6
|
|
1945
|
10
|
9
|
9
|
16
|
15
|
23
|
6
|
|
1950
|
10
|
9
|
9
|
15
|
15
|
22
|
5
|
|
1955
|
10
|
9
|
9
|
14
|
15
|
20
|
5
|
|
1960
|
10
|
9
|
9
|
13
|
15
|
19
|
5
|
|
1965
|
10
|
9
|
9
|
13
|
15
|
19
|
5
|
|
1970
|
10
|
9
|
8
|
12
|
15
|
18
|
5
|
|
1975
|
10
|
9
|
8
|
12
|
15
|
17
|
5
|
|
1980
|
9
|
9
|
8
|
11
|
15
|
16
|
5
|
|
1985
|
9
|
9
|
8
|
10
|
15
|
16
|
4
|
|
1990
|
9
|
8
|
8
|
9
|
15
|
15
|
4
|
|
1995
|
9
|
8
|
8
|
9
|
15
|
15
|
4
|
|
2000
|
8
|
7
|
7
|
9
|
14
|
14
|
4
|
|
2005
|
8
|
6
|
6
|
9
|
12
|
12
|
4
|
This table shows the errors per 100 games (900 defensive
innings) over time by position.
For example, to assign an error rating to a shortstop from 1912,
determine how many errors that player made per 100 games. Suppose
the player made 39 errors and was the shortstop about 80% of the
time. Based on a 154-game schedule, that's about 123 full games. In
100 games, he would have made 39 x 100 / 123 = 32 errors. Looking
at the rows for 1910 and 1915 in the table, we can estimate that
the average shortstop in 1912 made 43 errors per 100 games. Our
shortstop's rate is 32, which is 74% of 43, so his rating is
74.
Outfielder throwing
The strength and accuracy of an outfielder's throwing arm are
indicated in this rating, which is used whenever a runner tries to
take an extra base on a single, double or fly ball. These ratings
take values from Excellent to Poor.
When we assign throwing ratings for modern outfielders, we use
detailed information about the number of extra bases opposing
runners took on singles, doubles and fly balls hit to that
outfielder. We also look at the number of runners thrown out, but
outfielder assists can be misleading. Some outfielders pick up
meaningless assists on plays where one or two runners score on a
weak throw to the plate, and the batter is retired when the throw
is cut off.
If you are assigning throwing ratings for past seasons, we
suggest you compare assist totals across the league. Generally
speaking, the higher the assist total, the better the throwing arm.
This is not always true, of course, because some outfielders have
such a great reputation for throwing that nobody tries to run on
them (meaning their assist totals are low). So you will need to use
some judgment here.
Catcher throwing
This rating indicates the strength and accuracy of the catcher's
throwing arm and is used whenever a runner tries to steal second or
third. It has values from Excellent to Poor.
When we assign catcher throwing ratings for modern seasons, we
use detailed studies of play-by-play data to see how often opposing
runners challenged each catchers arm and what percentage of those
runners were thrown out. Our studies take into account any SB that
were credited to trailing runners on double steals and how often a
runner was caught stealing as a result of a pickoff throw by a
pitcher. Most importantly, we look at the performance of each
pitcher-catcher pair, an approach that helps us determine whether
it's the pitcher or catcher who deserves the credit or blame for
the results.
When assigning throwing ratings for past seasons, you can start
by comparing assist totals across the league. Keep in mind,
however, that the best throwing catchers often have lower assist
totals because opposing runners don't run on them in the first
place. As is the case with all DMB ratings, you will need to
use some judgment.
Passed ball rating
This number indicates how many times a catcher will allow a
passed ball in 1,000 plate appearances with
runners on base. The formula is similar to that for wild
pitch ratings for pitchers:
rating = (passed balls * 1000) / (batters caught *
.43)
Official statistics don't include batters caught, so you'll need
to estimate it. For example, if a team's pitchers faced 6300
batters and this catcher was behind the plate 72% of time, he
caught about 6300 * .72 = 4536 batters.
The .43 factor indicates that about 43% of all plate appearances
occur with runners on base. This number rises and falls with the
level of offense in the league.
Playing out of position
You can use a player at a defensive position for which he is not
rated, but his performance will suffer. How much? It depends.
Players can make a relatively painless transition to an easier
position that is similar to one they're already rated for. The
penalties are much greater for moving to a very different position
that is also more difficult to play.
For example, a CF can play LF or RF without suffering. Both
positions are similar and easier than the one he's rated for. A LF
or RF moving to CF has a more difficult time because there's more
ground to cover. Similarly, a move from SS to 2B won't cost you too
much, while a move from 2B to SS will hurt more. And the moves that
will hurt the most are (a) from any position to catcher, (b) a
catcher moving to any position except 1B, and (c) a 1B moving to CF
or another infield position.
How will these penalties show up? In lots of ways. More balls in
their zones will go for hits. They'll make more errors. Guys
without outfielder throwing or catcher throwing ratings will be
easier to run on. Unrated catchers will have more passed balls.
Unrated middle infielders won't start as many double plays on balls
hit to them, and they won't turn two as often when they're the
pivot man on the play.
You might ask why we don't improve
ratings when a player is moving to a less difficult position.
Couldn't a top-rated SS play 2B even better than the average 2B? In
the many years that we've been assigning fielding ratings, we've
seen a lot of players get better ratings when they make the
transition from a harder position to an easier one (especially SS
-> 2B, 3B -> 1B, and CF -> LF), but we've also seen plenty
of cases where the player needed some time to learn how to play the
new position.
Every position requires of a different set of skills. A CF
moving to RF needs to learn how to play the caroms on balls hit
down in the corner. A 3B needs great reflexes to handle the hot
smashes that come his way, and that might not be the strong suit of
a middle infielder moving to 3B. A SS moving to 2B must learn how
to make the pivot with his back to the runner.
If our out-of-position adjustments assumed that every player
could instantly adapt to a new position, even an easier one, we
think it would create too many opportunities for managers to abuse
the game by moving players around in ways that real-life managers
would never get away with. So the game imposes penalties of varying
degrees on all but a very few out-of-position players. The
exceptions are (a) center fielders moving to a corner outfield
spot, who do not suffer a range penalty or a change in their error
rate, and (b) shortstops moving to other infield positions, who
don't suffer a range penalty but are given an error-rate
penalty.
|

