 | Welcome to Diamond Mind Baseball |
|
| What's new and different |
 | User Interface Tips |
|
| Selecting Multiple Items in a List |
|
| Popup Menus |
|
| Tutorials |
|
| Tutorials Overview |
|
| Basic Tutorial |
|
| Setting Up |
|
| Game Options |
|
| Managers |
|
| Color and Text |
|
| The Game Screen |
|
| The Game Screen |
|
| Lineups |
|
| The Scoreboard |
|
| Batters |
|
| Pitchers |
|
| The Diamond |
|
| The Benches |
|
| The Boxscore, Scoresheet, and Game log Tabs |
|
| Sample Boxscore |
|
| Sample Scoresheet |
|
| Sample Game log |
|
| Playing the Game |
|
| Defensive Tactics |
|
| Offensive Tactics |
|
| When the Game is Over |
|
| Saving Game Data |
|
| Advanced Tutorial |
|
| Advanced Tutorial Setup |
|
| Game Day |
|
| Scheduled Games |
|
| Play Options |
|
| Setting the Lineup |
|
| Lineup Overview |
|
| Starting Pitchers |
|
| Batting Order |
|
| Setting Up a League |
|
| Introduction |
|
| League Setup Overview |
|
| Your Primary Tool |
|
| Common Scenarios |
|
| General Rules |
|
| Preparing the Database |
|
| Your First Database Decision |
|
| Starting with an Existing Database |
|
| Starting with a New Database |
|
| Gathering the Components |
|
| Introducing the Components |
|
| Assembling Eras |
|
| Assembling Teams |
|
| Assembling Parks |
|
| Assembling Players |
|
| Putting It All Together |
|
| The Big Picture |
|
| Creating a League |
|
| Creating an Organization |
|
| Assigning Teams |
|
| Assigning Players |
|
| Generating a Manager Profile |
|
| Creating a Schedule |
|
| Managing DMB Databases |
|
| What is a Database? |
|
| Converting Databases |
|
| Creating a New Database |
|
| Changing the Active Database |
|
| Copying a Database |
|
| Adding a Reference to an Existing Database |
|
| Removing a Reference to an Existing Database |
|
| Installing a Season Disk |
|
| Migrating a Database |
|
| Backing Up Your Data |
|
| Restoring Your Data |
|
| Organizer |
|
| Organizer Overview |
|
| Teams |
|
| Teams: Overview |
|
| Creating a New Team |
|
| Importing Teams |
|
| Parks |
|
| Parks: Overview |
|
| Parks: General Information |
|
| Parks: Physical Characteristics |
|
| Parks: Image Files |
|
| Parks: Weather Patterns |
|
| Parks: Statistical Factors |
|
| Creating a New Park |
|
| Importing Parks |
|
| Players |
|
| Overview of Players |
|
| Players: General Information |
|
| Players: Player UID |
|
| Players: Real-life Statistics |
|
| Players: DMB Statistics |
|
| Players: Ratings Overview |
|
| Players: Offensive Ratings |
|
| Players: Defensive Ratings |
|
| Players: Pitching Ratings |
|
| Players: Pitcher Profile |
|
| Players: Injury Ratings |
|
| Players: Injury and Usage Info |
|
| Creating a New Player |
|
| Modifying a Player |
|
| Importing Players |
|
| Player Profiles |
|
| Leagues |
|
| Overview of Leagues |
|
| Leagues: General Information |
|
| Leagues: League Teams |
|
| Leagues: Rules and Options |
|
| Leagues: Playing Time Limits |
|
| Leagues: Post-Season Information |
|
| Creating a New League |
|
| Organizations |
|
| Overview of Organizations |
|
| Organizations: General Information |
|
| Organizations: Rules and Options |
|
| Organizations: Playing Time Limits |
|
| Organizations: Post-Season Information |
|
| Creating a New Organization |
|
| Eras |
|
| Overview of Eras |
|
| Eras: General Information |
|
| Eras: Rates |
|
| Creating a New Era |
|
| Importing Eras |
|
| Schedules |
|
| Overview of Schedules |
|
| Creating a New Schedule |
|
| Schedule Editing |
|
| Adding Games |
|
| Copying Games |
|
| Scheduling Tools |
|
| Generating Regular-season Schedules |
|
| Generating Post-season Schedules |
|
| Schedule Templates |
|
| Importing and Exporting Schedules |
|
| Editing Game Results |
|
| Drafts |
|
| Drafting: Overview |
|
| Draft Preparation |
|
| Creating a Draft |
|
| Draft Window |
|
| Setting the Draft Order |
|
| Working with Draft Picks |
|
| Manual Picks |
|
| Computer Picks |
|
| Drafting and Manager Profiles |
|
| Resuming a Draft |
|
| Deleting a Draft |
|
| Notes |
|
| Overview of Notes |
|
| Editing Transactions and Injuries |
|
| Editing Transactions |
|
| Editing Injury Reports |
|
| Rosters and Manager Profiles |
|
| Roster/MP Window: Overview |
|
| Manager Profiles |
|
| What is a Manager Profile? |
|
| Pitching Chart |
|
| Saved Lineups |
|
| Depth Charts |
|
| Playing time limits |
|
| Manager Tendencies |
|
| Player Tendencies |
|
| Roster / manager profile window |
|
| Roster Management |
|
| Pitching chart page |
|
| Saved lineups page |
|
| Depth charts page |
|
| Manager tendencies page |
|
| Player tendencies page |
|
| Manager Profile Report |
|
| Manager profile generator |
|
| Playing Games |
|
| Playing Games: Overview |
|
| Exhibition Game Options |
|
| Managers: Human or Computer |
|
| Game view preferences |
|
| Modify Weather |
|
| Playing Scheduled Games |
|
| Scheduled game window |
|
| Starting scheduled games |
|
| Scheduled game options |
|
| Special Events |
|
| Starting Lineups and Substitutions |
|
| Overview of Lineup Selection |
|
| Lineup Selection: Window Layout and Tools |
|
| Lineup Selection: Using Real-life Lineups |
|
| Lineup Selection: Choosing Starting Pitchers |
|
| Lineup Selection: Choosing Starting Lineups |
|
| Lineup Selection: Loading Saved Lineups |
|
| Lineup Selection Making Substitutions During a Game |
|
| During the Game |
|
| Game Window |
|
| Pitching Tactics |
|
| Defensive Tactics |
|
| Offensive Tactics |
|
| Baserunning Decisions |
|
| Warmups and Substitutions |
|
| Other Options |
|
| Saving a game in progress |
|
| Resuming a saved game |
|
| NetPlay |
|
| NetPlay Overview |
|
| Preparing to Host a NetPlay Session |
|
| Finding Your IP Address |
|
| Firewalls |
|
| Opening a Port |
|
| The NetPlay Control Panel |
|
| NetPlay Options |
|
| Connecting to the Host |
|
| Chatting Before or After a Game |
|
| Starting a Game |
|
| Choosing Starting Pitchers and Lineups |
|
| Playing a Game |
|
| Quick Play |
|
| Chatting During a Game |
|
| Abandoning a Game |
|
| When a Game is Over |
|
| Disconnecting |
|
| If the Connection is Dropped |
|
| Trouble-shooting |
|
| Reports |
|
| Overview of Reports |
|
| Generating Reports |
|
| Displaying Reports on the Screen |
|
| Printing Reports |
|
| Saving Reports to a File |
|
| Custom Reports |
|
| Adding a New Column |
|
| Memorized Reports |
|
| HTML formatting |
|
| Report Options |
|
| Report Options Overview |
|
| Batting Register Report Options |
|
| Report Groups |
|
| Report Groups Overview |
|
| Two Ways to Use Report Groups |
|
| Generating a report group |
|
| Creating and Modifying a Report Group |
|
| Adding a Report to a Report Group |
|
| Generating a web site |
|
| Overview of Web Site Generation |
|
| Generating a web site |
|
| Transfers |
|
| Transfers: Overview |
|
| Setting up the League |
|
| Exporting a League Database |
|
| Installing a League Database |
|
| Creating a League Database |
|
| Exporting Statistics |
|
| Importing Statistics |
|
| Rebuilding Database Indexes |
|
| Updating Streaks and Usages |
|
| Tools |
|
| Restarting a Season |
|
| Resetting player usage |
|
| Trading Players |
|
| Releasing Players |
|
| Deleting team-specific player records |
|
| Generating Manager Profiles |
|
| Important Concepts |
|
| Bullpen Warmup Rule |
|
| Catcher fatigue |
|
| Clutch and Jam Ratings |
|
| Player Status Codes |
|
| Playing out of postion |
|
| Reading the Scoresheet |
|
| Reading the Game log |
|
| Real-life Transactions and Lineups |
|
| Sacrifice Fly Rules |
|
| Weather System |
|
| Uninstalling Diamond Mind Baseball |
Editing Transactions
DMB can maintain two separate sets of transactions. One is a set of real-life transactions that are automatically applied when you're using the Real-life transactions feature. The second is a set of DMB transactions that have been made in the course of your DMB season. The effect of editing these transactions is different in these two cases.
If you add, modify or delete real-life transactions, you aren't causing any roster moves to be made immediately. But these moves will be made when you next play the season with the real-life transactions feature turned on.
If you add, modify, or delete DMB transactions, you aren't causing any roster moves to be made, now or ever. All you are doing is correcting (presumably) DMB's record of past transactions that will show up in the transactions reports.
To edit transactions:
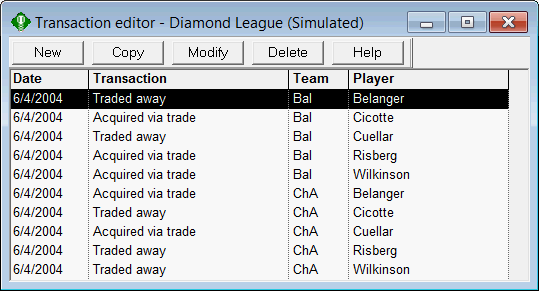
1. Click View on the DMB menu bar and select Transactions. The following window will appear:

2. You have the option to view all transactions for a specific team, a league, or all transactions in your database using the first pull down menu. If you select team or league, the second pull down menu will allow you to select a specific team or league.
NOTE: For modern seasons, there can be over 2000 transactions, or an average of about 70 per team. A list of 2000 transactions can be difficult to work with because the list is so long and you end up spending a lot of time scrolling up and down that list. That's why we included the option to display the transactions for one team at a time.
3. The final pulldown list allows you to select the source of the transaction data. This can be from real-life (we provide real-life transactions with some of our season disks) or from simulated transactions that you have conducted with your data.
4. Click OK. A window will appear that lists any existing transactions for the data you have selected.
Adding transactions
To add a transaction, click the New button at the top of the screen. This will open the following window:
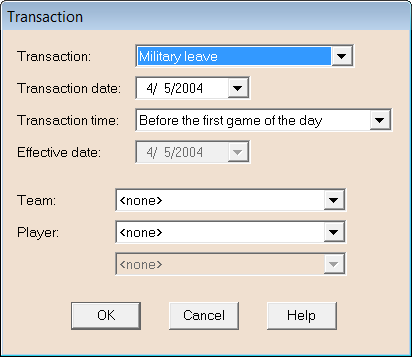
The first pull down menu lists all of the transaction types you can enter. The second pulldown allows you to set the Transaction date. The third pull down menu allows you to set at what time on the selected date the transaction will occur. Enter an effective date only when you place a player on the disabled list on a retroactive basis.
The last three pull down menus on this screen allow you to select the team and the player affected by the transaction and, if the transaction involves a trade, the team to which the player is to be traded.
Click OK to complete the transaction.
Copying and modifying transactions
These commands open the same window as is shown for Adding transactions above, but with the information from the selected transaction already filled in.
Deleting transactions
Select one or more transactions from the list and click on the Delete button. See Selecting Multiple Items in a List for instructions on how to select multiple transactions.